First of all we just need to go to prisma website to get the tutorial. The website link is below:
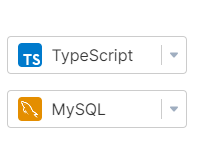
Then we can start by chosing type of the database that we are using.
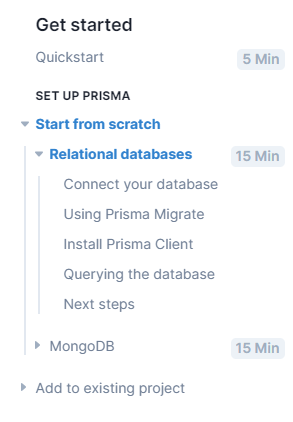
In this tutorial, I will use Relational Database MYSQL.
Project Setup
npm init -y
npm install prisma typescript ts-node @types/node nodemon --save-dev
npm i: This is a shorthand for running thenpm installcommand, which is used to install packages and dependencies required in the project.--save-dev: This is an option used along withnpm installto indicate that the installed packages will be added as development dependencies (devDependencies). DevDependencies are packages needed during the development phase but not required when the application runs in a production environment.prisma: This is the Prisma ORM (Object-Relational Mapping) that helps manage interactions with the database. Prisma allows you to perform CRUD (Create, Read, Update, Delete) operations on the database using code-based models and queries.typescript: This is a programming language that brings optional static typing and modern features to JavaScript. By using TypeScript, you can write safer, more maintainable JavaScript code with additional features like type inference, module support, and more.ts-node: This is a library that enables you to run TypeScript code directly in Node.js without the need to transpile TypeScript code into JavaScript first. It is particularly useful when developing applications with TypeScript because you can easily run and test code without a separate compilation step.@types/node: This is the TypeScript type definitions for Node.js. By installing this package, you get strong typing support for the APIs and objects defined in Node.js.nodemon: This is a tool that monitors changes in your project files and automatically restarts the Node.js application whenever there is a change. It is particularly useful during the development phase as you don't have to manually restart the application every time you make a code change.
This creates a package.json with an initial setup for your TypeScript app.
Next, initialize TypeScript:
npx tsc --init
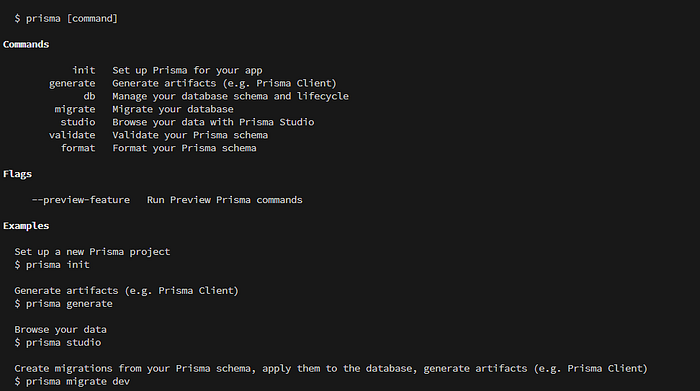
You can now invoke the Prisma CLI by prefixing it with npx:
npx prisma
Next, set up your Prisma project by creating your Prisma schema file with the following command:
npx prisma init
Before we move forward, i suggest you to read about what is schema in prisma.
Connect your database
Connect your database
To connect your database, you need to set the url field of the datasource block in your Prisma schema to your database connection URL:
datasource db {
provider = "postgresql"
url = env("DATABASE_URL")
}
Note that the default schema created by prisma init uses PostgreSQL, so you first need to switch the provider to mysql:
datasource db {
provider = "mysql"
url = env("DATABASE_URL")
}
In this case, the url is set via an environment variable which is defined in .env:
DATABASE_URL="mysql://johndoe:randompassword@localhost:3306/mydb"
We recommend adding .env to your .gitignore file to prevent committing your environment variables.
You now need to adjust the connection URL to point to your own database.
The format of the connection URL for your database typically depends on the database you use. For MySQL, it looks as follows (the parts spelled all-uppercased are placeholders for your specific connection details):
mysql://USER:PASSWORD@HOST:PORT/DATABASE
Here’s a short explanation of each component:
USER: The name of your database userPASSWORD: The password for your database userPORT: The port where your database server is running (typically3306for MySQL)DATABASE: The name of the database
As an example, for a MySQL database hosted on AWS RDS, the connection URL might look similar to this:
DATABASE_URL="mysql://johndoe:XXX@mysql–instance1.123456789012.us-east-1.rds.amazonaws.com:3306/mydb"
When running MySQL locally, your connection URL typically looks similar to this:
DATABASE_URL="mysql://root:randompassword@localhost:3306/mydb"
Using Prisma Migrate
Creating the database schema
In this guide, you’ll use Prisma Migrate to create the tables in your database. Add the following Prisma data model to your Prisma schema in prisma/schema.prisma:
model Post {
id Int @id @default(autoincrement())
createdAt DateTime @default(now())
updatedAt DateTime @updatedAt
title String @db.VarChar(255)
content String?
published Boolean @default(false)
author User @relation(fields: [authorId], references: [id])
authorId Int
}
model Profile {
id Int @id @default(autoincrement())
bio String?
user User @relation(fields: [userId], references: [id])
userId Int @unique
}
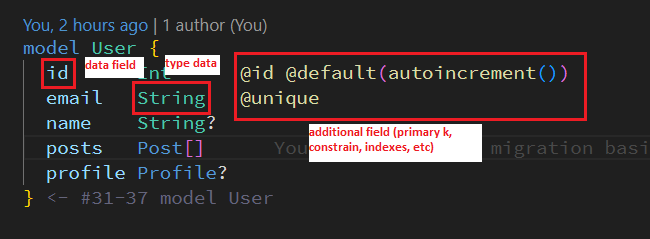
model User {
id Int @id @default(autoincrement())
email String @unique
name String?
posts Post[]
profile Profile?
}
To map your data model to the database schema, you need to use the prisma migrate CLI commands:
npx prisma migrate dev --name init
This command does two things:
- It creates a new SQL migration file for this migration
- It runs the SQL migration file against the database
The command npx prisma migrate dev --name init is used to execute database migrations using Prisma. Here's the explanation of each component of the command:
npx: This command is used to run locally installed packages.prisma: Refers to the Prisma CLI (Command Line Interface) command used to perform Prisma-related tasks.migrate: It is a sub-command used to run database migration operations.dev: This option indicates that the migration command is executed in development mode. It follows the migration configuration specified in the Prisma schema.--name init: This option provides a name for the migration being executed. In this example, the migration is named "init".
Overall, the command npx prisma migrate dev --name init will run database migration in development mode, using the migration named "init" as specified in the Prisma schema.
Note:
_generate_is called under the hood by default, after running_prisma migrate dev_. If the_prisma-client-js_generator is defined in your schema, this will check if_@prisma/client_is installed and install it if it's missing.
Great, you now created three tables in your database with Prisma Migrate 🚀
CREATE TABLE "Post" (
"id" SERIAL,
"createdAt" TIMESTAMP(3) NOT NULL DEFAULT CURRENT_TIMESTAMP,
"updatedAt" TIMESTAMP(3) NOT NULL,
"title" TEXT NOT NULL,
"content" TEXT,
"published" BOOLEAN NOT NULL DEFAULT false,
"authorId" INTEGER NOT NULL,
PRIMARY KEY ("id")
);
CREATE TABLE "Profile" (
"id" SERIAL,
"bio" TEXT,
"userId" INTEGER NOT NULL,
PRIMARY KEY ("id")
);
CREATE TABLE "User" (
"id" SERIAL,
"email" TEXT NOT NULL,
"name" TEXT,
PRIMARY KEY ("id")
);
CREATE UNIQUE INDEX "Profile.userId_unique" ON "Profile"("userId");
CREATE UNIQUE INDEX "User.email_unique" ON "User"("email");
ALTER TABLE "Post" ADD FOREIGN KEY("authorId")REFERENCES "User"("id") ON DELETE CASCADE ON UPDATE CASCADE;
ALTER TABLE "Profile" ADD FOREIGN KEY("userId")REFERENCES "User"("id") ON DELETE CASCADE ON UPDATE CASCADE;
Install Prisma Client
Prisma Client is a client code generated by Prisma based on your model definition in the Prisma schema. It serves as an interface to interact with your database.
With Prisma Client, you can perform various database operations such as creating, reading, updating, and deleting (CRUD) entities in the database. Prisma Client provides methods that you can call in your application code to easily communicate with the database.
Prisma Client is built using TypeScript technology and provides type-safe functions that integrate well with code editors supporting features like automatic authentication, schema inspection, and IntelliSense. This helps save time and minimize errors during application development.
By using Prisma Client, you can access data quickly and efficiently from the database according to the model definition in the Prisma schema, while maintaining the integrity of data types and relationships between entities that you have defined.
Install and generate Prisma Client
To get started with Prisma Client, you need to install the @prisma/client package:
npm install @prisma/client
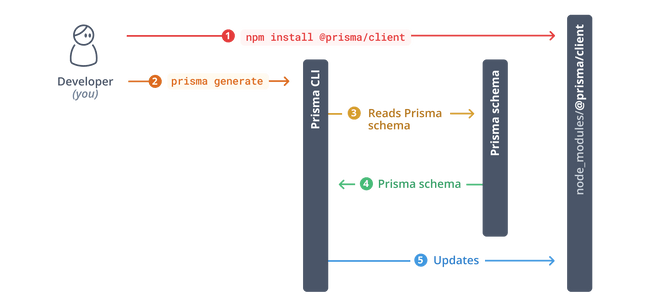
Whenever you update your Prisma schema, you will have to update your database schema using either prisma migrate dev or prisma db push. This will keep your database schema in sync with your Prisma schema. The commands will also regenerate Prisma Client.
Then run this in cmd
npx prisma generate
So, the command npx prisma generate is used to generate Prisma Client, which is a client-side code that facilitates your interaction with the database using Prisma.
Querying the database
Write your first query with Prisma Client
Now that you have generated Prisma Client, you can start writing queries to read and write data in your database. For the purpose of this guide, you’ll use a plain Node.js script to explore some basic features of Prisma Client.
Create a new file named index.ts and add the following code to it:
import { PrismaClient } from '@prisma/client'
const prisma = new PrismaClient()
async function main() {
}
main()
.then(async () => {
await prisma.$disconnect()
})
.catch(async (e) => {
console.error(e)
await prisma.$disconnect()
process.exit(1)
})
Here’s a quick overview of the different parts of the code snippet:
- Import the
PrismaClientconstructor from the@prisma/clientnode module - Instantiate
PrismaClient - Define an
asyncfunction namedmainto send queries to the database - Call the
mainfunction - Close the database connections when the script terminates
Inside the main function, add the following query to read all User records from the database and print the result:
async function main() {
const allUsers = await prisma.user.findMany()
console.log(allUsers)
}
Now run the code with this command:
npx ts-node index.ts
This should print an empty array because there are no User records in the database yet:
[]
Write data into the database
The findMany query you used in the previous section only reads data from the database (although it was still empty). In this section, you'll learn how to write a query to write new records into the Post and User tables.
Adjust the main function to send a create query to the database:
async function main() {
await prisma.user.create({
data: {
name: 'Alice',
email: '[email protected]',
posts: {
create: { title: 'Hello World' },
},
profile: {
create: { bio: 'I like turtles' },
},
},
})
const allUsers = await prisma.user.findMany({
include: {
posts: true,
profile: true,
},
})
console.dir(allUsers, { depth: null })
}
This code creates a new User record together with new Post and Profile records using a nested write query. The User record is connected to the two other ones via the Post.author ↔ User.posts and Profile.user ↔ User.profile relation fields respectively.
Notice that you’re passing the [include](https://www.prisma.io/docs/concepts/components/prisma-client/select-fields#include-relations-and-select-relation-fields) option to findMany which tells Prisma Client to include the posts and profile relations on the returned User objects.
Run the code with this command:
npx ts-node index.ts
The output should look similar to this:
[
{
email: '[email protected]',
id: 1,
name: 'Alice',
posts: [
{
content: null,
createdAt: 2020-03-21T16:45:01.246Z,
updatedAt: 2020-03-21T16:45:01.246Z,
id: 1,
published: false,
title: 'Hello World',
authorId: 1,
}
],
profile: {
bio: 'I like turtles',
id: 1,
userId: 1,
}
}
]
The query added new records to the User and the Post tables:
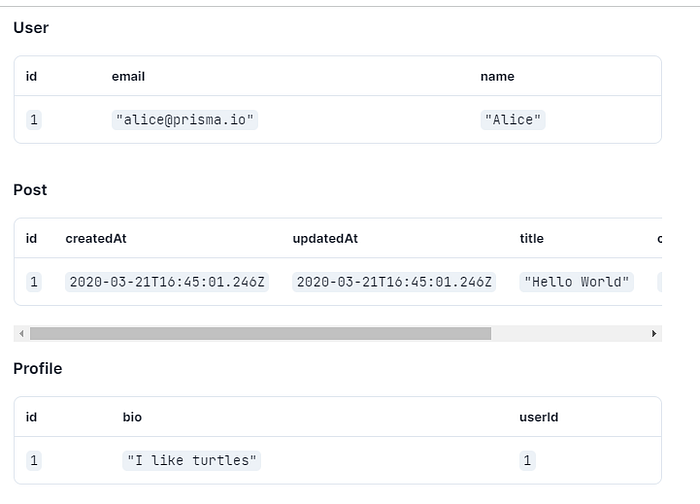
Note: The numbers in the
_authorId_column on_Post_and_userId_column on_Profile_both reference the_id_column of the_User_table, meaning the_id_value_1_column therefore refers to the first (and only)_User_record in the database.
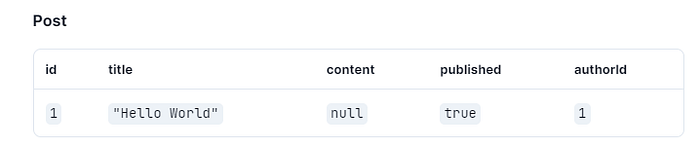
Before moving on to the next section, you’ll “publish” the Post record you just created using an update query. Adjust the main function as follows:
async function main() {
const post = await prisma.post.update({
where: { id: 1 },
data: { published: true },
})
console.log(post)
}
Now run the code using the same command as before:
npx ts-node index.ts
You will see the following output:
{
id: 1,
title: 'Hello World',
content: null,
published: true,
authorId: 1
}
The Post record with an id of 1 now got updated in the database:
Fantastic, you just wrote new data into your database for the first time using Prisma Client 🚀
Model Fields
In the context of SQL, “field” refers to a column or attribute in a table. Each row in a table has several columns or attributes that represent different data. Each of these columns is called a “field”.
For example, if you have a table called “Customers” with columns such as “CustomerID”, “FirstName”, “LastName”, and “Email”, each of these columns is a field that represents specific data.
Fields in SQL define the data type stored in a column, such as string, number, date, or boolean. Fields can also have additional properties like primary key, constraints, or indexes to organize and optimize data access.
Fields play a crucial role in organizing and storing data in SQL databases. They allow us to store, retrieve, update, and delete data in a structured and organized manner.